This allows you to burn-in selected items of camera metadata into the visible area of each video frame with frame accuracy.

Example metadata burned-in
Note that if you simply want to time-stamp your files then use the Burn-In Time Stamp or Burn-In New Time Stamp tool instead.
The metadata items are:
•Timecode
•User Bits
•Time of Recording
•Date of Recording
•Shutter speed
•Aperture (f-stop)
•Exposure Mode
•Gain in dB
•Focus Distance in metres
•Focus Mode
•White Balance
•Image stabilizer on/off
•Audio details (DV file types only)
Also for files from AVCHD, XAVC-S, GoPro and Contour and some other cameras that have a built-in GPS unit, the following Geotagging metadata items are available:
•Latitude
•Longitude
•Altitude
•Speed
•Track (direction of motion)
The Geotagging metadata items are usually also available when Sony AVCHD cameras are set to standard definition MPEG-2 PS mode. The format of the Geotagging items can be chosen by the Geotagging options in Tools > Options > General.
You can also burn-in a line of custom text which may contain a brief message or perhaps your own identifier used in your video project. The text can also contain a tag which will automatically be filled with the name or pathname of the video file.
The metadata text is written directly onto the image, but you can choose instead to have it written onto a solid rectangular black background which you may find easier to read, but will obscure more of the image.
You can choose the font, size and position of each item of metadata text; and choose a language and custom format for the recording date and time items - see Options - Burn-in for more details.
You can also specify an image file to be burnt-into the video. The image file may be PNG, BMP, JPG or GIF format. You may find this useful if you have a company logo that you want to have burnt-into the whole duration of the video file. If you have designed the image file with transparency, then it will be correctly anti-aliased with per-pixel transparency so that it has a pleasing natural appearance. You can also set the position, size and overall transparency of the image on the video frame.
The output file type can be chosen from a selection of MP4, AVI or WMV with specific video compression schemes.
If you choose AVI file as the output file type, you can also choose to "burn-in" the metadata text on a transparent background instead of on the video frames by checking the Transparent background (alpha channel) option. This is usually faster than performing a burn-in onto video frames, and it may be useful in video editing programs which support alpha transparency, where a transparent-background burn-in file can be imported onto a separate layer which allows the text to appear across the video frames of other layers. See the Options - Burn-in Output section for more details of the AVI file transparent background option.
By default, the whole file is burned-in. However, if you have a lengthy video file but you only want a few seconds of burned-in footage from it, you can easily set a selection range of just the short section you want, and only that section will be burned-in - you will find this is a massive time-saver! You set the selection range by marking its In and Out (start and end) points. Drag the slider and/or use the cursor keys to go to the beginning of the range then click Play > Mark In (or press the [ key), then drag the slider to the end of the range and click Play > Mark Out (or press the ] key). Now when you use the Burn-in Metadata tool only the selected range of video will be burned-in. For more details see Mark In and Mark Out.
|
INFORMATION: If you simply want a single still-frame image with burned-in metadata (perhaps to send as an email attachment or to include in a document), you should instead use File > Save Image or File > Copy Image to Clipboard - see Save Image and Copy Image to Clipboard for more details.
|

The operation of the burn-in tool is slightly different for DV AVI and DV MOV files, compared to other supported file types, so they are described separately below.
Burning-in DV AVI and DV MOV files
For DV AVI or DV MOV files, the burned-in output file is always of the same file type. The DV AVI or DV MOV files are the most convenient for working with DV footage, so these are the only output type supported for these input file types.
When you select Tools > Burn-in Time Stamp or Tools > Burn-In Metadata, a Confirm Settings dialog box appears where you can check and if necessary change any of the burn-in options. These are the same settings that appear in the Burn-In section of the Tools > Options menu. See Options - Burn-in for more details.
When you are satisfied that the settings are correct, click OK, and you are prompted for an Output File name. The default file name is the same as the input file except that "-burn" is appended to the part before the .avi or .mov extension (e.g. myfile-burn.avi or myfile-burn.mov).
DVMP Pro will then make an exact copy of the existing AVI or MOV file to the output file name, except that each frame of the output file will have the metadata values written across it.
Burning-in non-DV files
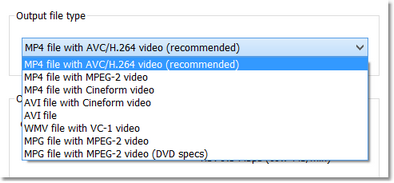 For AVCHD MTS/M2TS, HDV M2T, MPEG-2 PS (Sony HDD/DVD or MOD), MOV or MP4 input files you can select from several burned-in output file types - MP4, AVI and WMV with specific video compression schemes.
The output file type is selected in Tools > Options > Burn-in > Output.
There is a different group of settings associated with each of the output file types. When you use the drop-down list to choose an output file type, the corresponding group of settings are displayed beneath it. The settings for each output file type are described in detail in the Burn-in Output section.
The best recommendation for the output file type is MP4 file with AVC/H.264 video, partly because it is so well supported by other video software which should have no problem importing these files; but chiefly because it is hardware accelerated on most computers that have Intel processors which means that burn-in completes faster and produces smaller output files. We recommend you always use MP4 file with AVC/H.264 video unless you have good reason not to.
If you select AVI file as the output file type, you can select its video compression scheme by choosing an output AVI video compressor. By default, "Uncompressed" is used but this uses a lot of disk space, so you are advised to select one of the compressors in the list by clicking the adjacent Select button.
The output file type WMV file with VC-1 video can sometimes be useful but it is quite slow to stamp.
You can also choose whether the input file's audio stream is included in the burned-in output file by checking Include audio stream in output file. If you uncheck this option the output file will contain only the burnt-in video without an audio stream (i.e. silent).
Please note that a currently selected video decoder (in the Tools > Options > Video Decoders menu) is used during the burning-in procedure to read the input file. For further details on selecting a video decoder, see the Options - Video Decoders section.
When you select Tools > Burn-in Time Stamp or Tools > Burn-In Metadata, a Confirm Settings dialog box appears where you can check and if necessary change any of the burn-in options. These are the same settings that appear in the Tools > Options > Burn-in menu. See the Options - Burn-in section for more details.
When you are satisfied that the settings are correct, click OK, and you are prompted for an Output File name. The default file name is the same as the input file except that "-burn" is appended to the part before the .mp4 .avi .wmv or .mpg extension (e.g. myfile-burn.mp4).
DVMP Pro will then create the burned-in file. The amount of time this takes will vary widely depending on which output file type is chosen, and if AVI file is chosen, on the selected output AVI video compressor.
By default, the whole file is burned-in. However, if you have a lengthy video file but you only want a few seconds of burned-in footage from it, you can easily set a selection range for just the short section you want, and only that section will be time-stamped - you will find this is a massive time-saver! You set the selection range by marking its In and Out (start and end) points. Drag the slider and/or use the cursor keys to go to the beginning of the range then click Play > Mark In (or press the [ key), then drag the slider to the end of the range and click Play > Mark Out (or press the ] key). Now when you use the Burn-in Time Stamp tool only the selected range of video will be time-stamped. For more details see Mark In and Mark Out.
|
INFORMATION: If you simply want a single burned-in still-frame image (perhaps to send as an email attachment or to include in a document), you should instead use File > Save Image or File > Copy Image to Clipboard - see Save Image and Copy Image to Clipboard for more details.
|
Please note that although DVMP Pro sets the correct display aspect ratio in the burnt-in AVI files, some software ignores this and may incorrectly identify the display aspect ratio for some video resolutions. For example if your camera's recording resolution is 1440x1080 (non-square pixels) the burned-in AVI file may be interpreted incorrectly as 4:3 by video editing packages and other programs which will make it appear horizontally squeezed. In this case you may have to set the display aspect ratio manually to 16:9 within your editing program. The other output file types are not affected by this problem.
See Also: